Scaling Performance
This document provides a description of M-Star benchmark test cases, test platforms, test methodology, and expected results.
The benchmark package which contains the cases and scripts described here –
Benchmark PackageOr if you have M-Star version 3.3.140+, you can generate the cases with the command
mstar-util -b
The results shown here use M-Star CFD version 3.3.123.
Test Sets
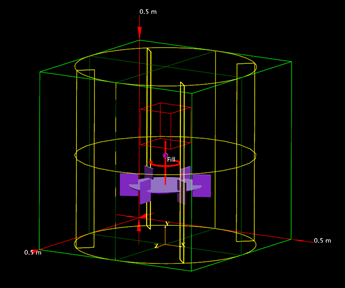
Agitated case with particles
This group of tests is based on the built-in agitated test case example. The base case has been modified to optimize performance by reducing disk io and runtime length. The resolution is varied such that a range of resolutions. The case has one moving Rushton impeller and a particle set.
Case Name |
Resolution on X |
Lattice Size [M] |
agitated-100 |
100 |
1 |
agitated-200 |
200 |
8 |
agitated-300 |
300 |
27 |
agitated-400 |
400 |
64 |
agitated-500 |
500 |
125 |
agitated-800 |
800 |
512 |
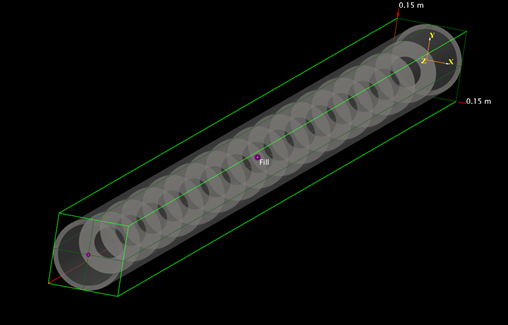
Baffled Pipe
This test case uses the built in example “Open Systems and Boundary Conditions”. It is a baffled pipe with no moving objects or particles.
Case Name |
Resolution on X |
Lattice Size [M] |
pipe-50 |
50 |
2.6 |
pipe-100 |
200 |
20.8 |
pipe-150 |
300 |
70.2 |
pipe-200 |
400 |
166 |
pipe-250 |
500 |
325 |
pipe-360 |
800 |
970 |
Test Method
Cases are run on 1, 2, 4, and 8 gpus on both V100 and A100 GPU systems.
Some solver parameters are overridden to run the tests more efficiently:
Runtime = 0.01
VTK Output disabled
Checkpoint files disabled
Statistics interval = 0.001
You have the option running each test case manually using the standard mstar cfd solver commands or you may use the provided helper scripts.
Using the benchmark helper scripts
Scripts are provided with package to help run the tests:
Run.sh Script to setup environment
Run.py Script to run actual benchmark, set parameters, clean up data, etc
Post.py Script to quickly examine output data
Platform_info.sh Script to log platform details such as GPU setup
Edit the run.sh script to setup your execution environment. This includes setting the license, mstar install location and openmpi environment
Execute the run.sh script
This script logs your platform information and runs all the cases in the directory with 1, 2, 4, and 8 GPUs
Wait for the cases to finish
At this point you have all of the timing data available in each of the out-* directories in each case. You can process this data yourself or use the included post.py script to view the results.
To show the benchmark data results you will need python and the pandas library
Run python post.py
This script will read all the available timing data and print it to the screen
Platforms
Setup
The platforms were setup by installing CUDA 11.x and OpenMPI 4.1 with CUDA aware support.
AWS p3.8xlarge (V100)
The AWS p3.8xlarge instance is used to access eight V100 GPUs. The following system parameters are noted:
Ubuntu 20.04
CUDA 11.5
Driver 495.46
V100 SXM2 16GB
Platform does not have full peer access on all 8 GPUs
It should be emphasized that this instance type does not have full peer access between all GPUs. Therefore when using all 8 GPUs in a simulation, some solver communication will occur over the PCI bus instead of NVLINK. This results in significant performance degradation and poor scaling. This platform is similar to the Nvidia DGX-1 platform with the hybrid cube mesh topology.
GCE A2 highgpu (A100)
Google compute engine instance a2-highgpu-8g with 8x A100 GPUs are used to access the A100 architecture. The following system paratemrs are noted:
Debian 10
CUDA 11.2
Driver 460.73.01
A100 SXM4 40GB
Test Results
The follow result tables show the average MLUPS value over the simulation as run on 1, 2, 4, and 8 GPUs. Where a zero value is present, the case did not run due to insufficient memory.
AWS p3.8xlarge (V100)
Important
AWS p3 instances only have peer access up to 4 GPUs. This degrades performance when running on 8 GPUs.


GCE A2 highgpu (A100)


Key Takeaways
Use an appropriate number of GPUs to use your resource more effectively. 30-60M or more lattice points per GPU is a good rule of thumb.
Always use platforms with full peer access between all GPUs (NVLINK/NVSWITCH)
Reduce your checkpoint/output/statistics intervals to the minimum necessary required. These increase disk io and data communication.
Adding physics such as particles and scalar fields will impact performance
Adding moving boundaries will impact performance