Loading Initial State
Overview
Loading Initial State is a powerful feature that enables flexible and efficient simulation workflows. A common use case is to begin with a low-resolution simulation to capture the overall flow behavior at reduced computational cost, then use the resulting state as the starting point for a higher-resolution simulation. This approach preserves the developed flow field while significantly reducing total runtime.
Initial State can also be used to control particle configurations. For example, a particle arrangement saved in a checkpoint file can be loaded into a different simulation to reproduce a specific starting distribution or to continue studying particle behavior under new conditions.
By allowing previously computed states to seed new simulations, Initial State supports faster iteration, scenario reuse, and more advanced study design.
Note
When external data is used as an initial condition, it overrides any values set on the object. As a result, settings like particle dump times are ignored in favor of the loaded data, and M-Star Pre may issue warnings.
Getting Started
To use the Initial State check point mapping capability, first define where the source is located on the computer and how to reference it. Under Simulation Parameters / Initial State / State Mode / External Load, scroll down to State Map and select Edit ( ).
).
The following window should appear:
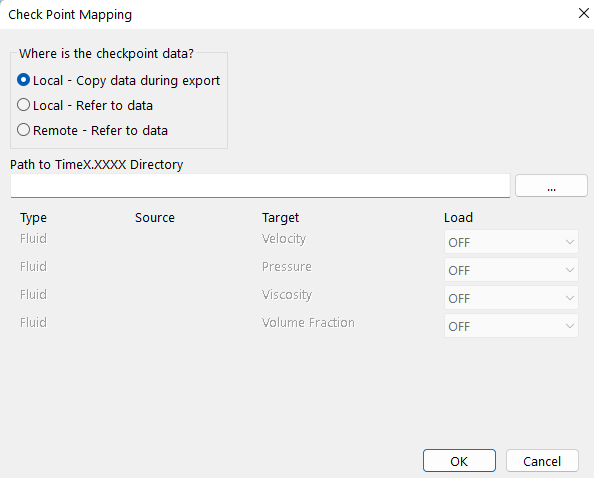
Check Point Mapping Window
Where is the checkpoint data?
○ Local - Copy data during export: If the source data are located on the computer you are currently using, you may use this option. When you export the case, the source data will be copied into the new case. This helps to make the case more self-contained.
○ Local - Refer to data: If the source data are located on the computer you are currently using, you may use this option. It’s the same as the previous option, but no source data are copied into the new case when you run/export the simulation. This is more efficient, but makes the simulation less self-contained. If you change or delete the source data at some point, this simulation will no longer run.
○ Remote - Refer to data: If you are preparing a simulation to run on a remote resource, you will need to use this option. The absolute path to the source data on the remote resource will be required.
Path to TimeX.XXXX Directory
The source data are chosen by selecting a checkpoint TimeX.XXXX directory in source case. These directories live under a case at out\Checkpoint\TimeX.XXXXX. Select the time you want to use for mapping. If the case data are local, you will be able to use the … button to select the data location.
Type Source Target Load Table
The remainder of the form shows how the source data will be mapped onto the current case. If you choose one of the Local data source options, you will see the available data names in the Source column. The Target column shows the available target names from the current case. The Load column allows you to turn on/off data mapping for the displayed fields.
Loading Initial State from Another Case
This tutorial will demonstrate how to load initial state from another case with a different resolution. We will run a simple simulation for five seconds, change its resolution, then run the simulation for another five seconds.
Create a directory structure on your computer to contain this tutorial:
initial-state-test/
    90/
    100/
Create a Base Line Case
Create a new case using the Agitated System
File > New from template > Agitated System
Set ResolutionLX = 90
Set Max Run Time = 5
Save the msb file to
initial-state-test/90/sim.msbClick Run. Choose the directory:
initial-state-test/90/Run the case and wait for it to complete
Create a Case with Changed Resolution
Go back to the pre processor and save a copy of the original case to:
initial-state-test/100/sim.msbSet ResolutionLX = 100
Set Max Run Time = 5
Set the Initial State Option = ExternalLoad
Set the Initial State Path = (Browse to the
initial-state-test/90/out/Checkpoint/directory and pick the most recent checkpoint directory)Save the msb file to
initial-state-test/100/sim.msbClick Run. Choose the directory
initial-state-test/100/Run the case and wait for it to complete
Tip
If you need to move the case directory to run on a different machine, be sure to include the initialState/ directory along with your input files.
Results
The case structure should look roughly as follows:
initial-state-test/
    90/
        out/
        sim.msb
        input.xml, etc
    100/
        initialState/    <-- Initial state copied from original case. Be sure to copy this directory along with the input files if you need to run the case on another machine
        out/
        sim.msb
        input.xml, etc
You can look at the output of the 100 case in M-Star Post and see that the fluid field near time zero was interpolated from the original case. Also note that the particles field state is not loaded from the original case checkpoint. The initial state loading functionality only loads fluid state and scalar fields.
Legacy Text:
How to use Restart Initialization
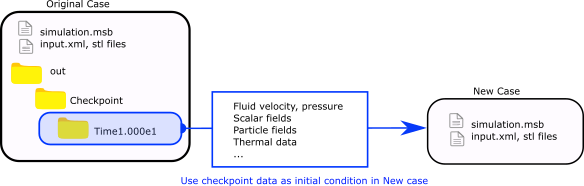
This capability allows you to start a new simulation using an initial condition based on a previously run simulation. The initial condition is provided by the Restart/Checkpoint data. The basic steps described in this workflow are:
Create a simulation
Run solver (1)
Create copy of MSB file
Configure restart initialization in new model
Run solver (2) – This uses initial condition data from the results of (1)
It is recommended to keep the file structure separate for the two cases. The below text shows a notional file/directory structure.
|-- run-1/                      (Original/Source case providing initial conditions for subsequent runs)
|   |-- run1.msb
|   |-- input.xml, *.stl
|   |-- out/
|       |-- Stats/
|       |-- Output/
|       |-- Checkpoint/
|           |-- TimeX.XXXXX/    (This is the initial condition data)
|-- run-2/                      (New/Target case using initial condition from run-1)
    |-- run2.msb
    |-- input.xml, *.stl
    |-- out/
The second simulation (run-2) will reference the first simulation (run-1) checkpoint data. Therefore it is important that the location of run-1 does not change.
Important
Note the location of the initial condition data. This is located at out/Checkpoint/TimeX.XXXX in the original case results, where TimeX.XXXX is the chosen checkpoint time data folder.
Basic Workflow
Create a basis simulation
This simulation will provide the initial condition data to our next simulation. The only requirement here is to enable checkpoint writing, which is on by default. Go to the Output settings panel (click the Output button). On the Restart Files page, make sure restart files are configured.
Run the simulation
No special requirement here. Just run the simulation as usual. Wait for it to finish.
Create a copy of the MSB file
Copy the MSB file to a new location and open it in M-Star Pre. The remainder of the instructions will use this MSB file.
Configure Restart Initialization
Click on Simulation Parameters in the Model tab
Change the Initial State Mode to External Load
Click Edit
The Check Point Mapping form should appear. This window contains all of the initial state loading configuration and displays how source data will map onto the new simulation. It parses the available data from the original checkpoint files if available.
Click Local - Refer to data .
Set the Path to TimeX.XXXXX directory by pasting the text or clicking the browse button. This directory should be set to the checkpoint restart time directory of the previously run simulation. This directory is shown above in the example folder structure.
Once the checkpoint path is set, the available data will appear in the Source column in the table. Depending on how the new simulation is configured, every field may or may not be matched in the Target data column. If the source data cannot be matched to a target, it will not be available for loading. Therefore any fields (scalar, particles) that you want to load from the original case must have the same name.
Use the Load column to configure how each field is loaded or not loaded.
Click OK
Run the solver
Click Run. This second simulation will load the initial condition data from the first simulation.